Citadel: Binary Static Analysis Framework
Introduction
Figuring out why an implant is being detected (statically) is a frustrating game. Tools such as ThreatCheck and GoCheck exist to tackle this problem, and do a decent job. However, an issue I had with these is that when I want to execute it, I need to copy a file onto a Virtual Machine. But, at this point, Defender would eat it before I even got to test it. That's where projects like avred come in, this introduces a HTTP API to allow a more remote implementation.
In this blog, I want to introduce the result of a weeks angry development: mez-0/citadel. Citadel uses MongoDB to store its objects, and I have some plans for further work. But, generally, I have been using it to analyse malware samples at a glance, and I have found it quite useful - especially when testing the inner workings of your payload before deployment.
Below is an example of the dashboard:
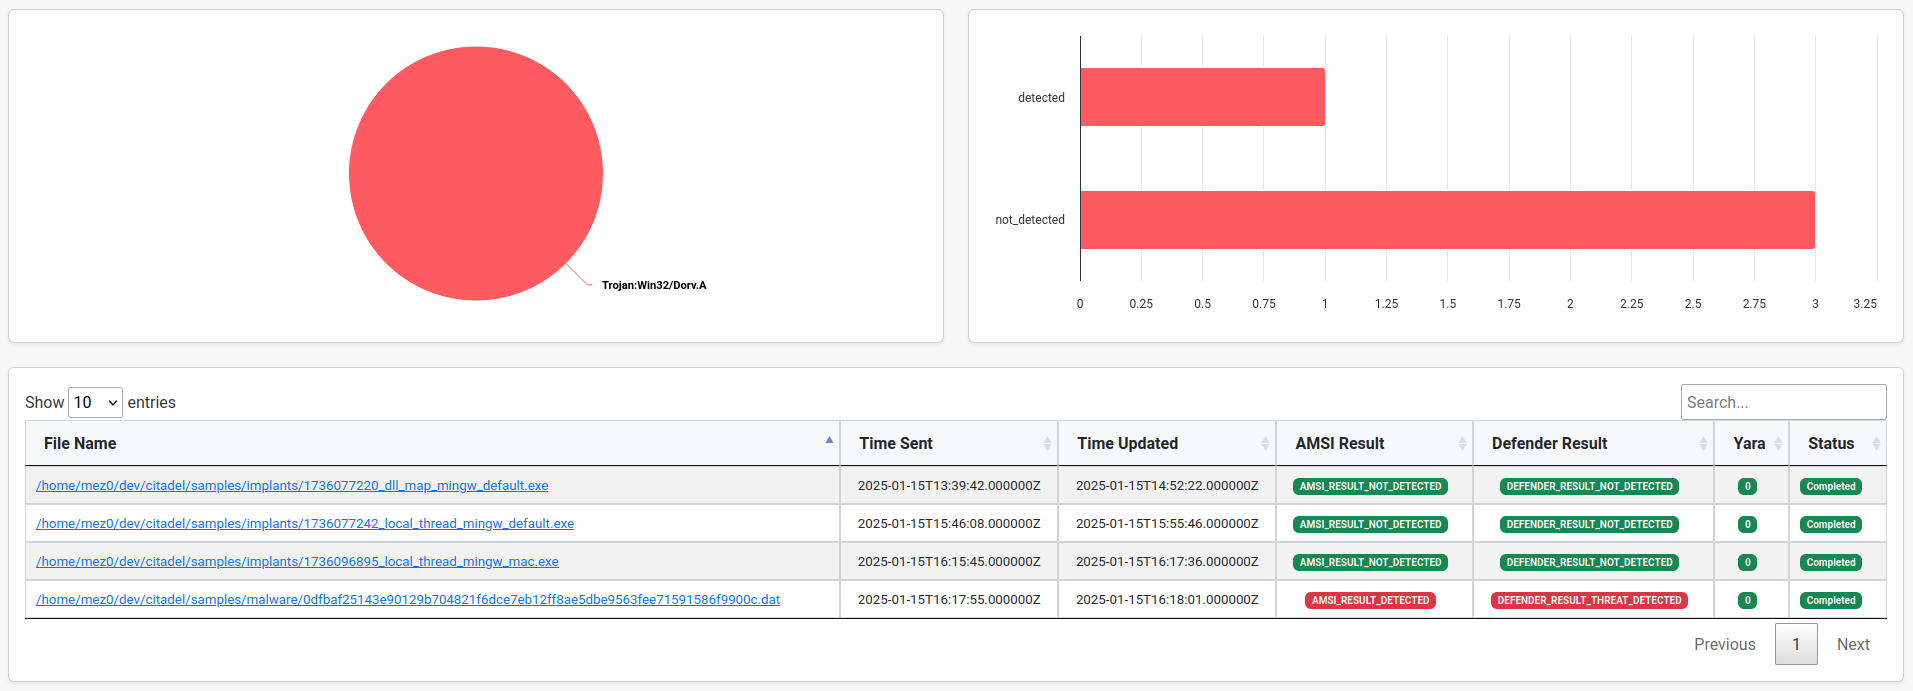
Later in the blog, we will look at the summary page which gives us a look at the inner workings of the sample 🚀
Workflow
To use this framework, point citadel.py at a directory or file and pass in any
arguments. Here is the help:
Usage: citadel.py [-h] [-f] [-d] [-y] [--thorough-defender] [--show-ascii-bytes] [--tlsh-distance] [--no-defender] [--no-capa]

    🏰 Citadel

    Options:
      -h, --help           show this help message and exit
      -f, --file           File to process
      -d, --directory      Directory to process
      -y, --yara           Yara rule(s) to apply
      --thorough-defender  Enable thorough defender (default: False, may take a while)
      --show-ascii-bytes   Show ASCII bytes
      --tlsh-distance      TLSH distance (default: 50)
      --no-defender        Only run the preprocessing modules
      --no-capa            Do not run capa
Here is an example command targeting a payload from my other framework:
bash python3 citadel.py -f samples/implants/1736077242_local_thread_mingw_default.exe --show-ascii-bytes --tlsh-distance 50 --yara /tmp/yaraThis will run preprocessing for yara and TLSH distances before creating a task and storing that within the database. In addition, Citadel will also parse the PE and store that in a separate collection.
Next, it will wait for the dotnet agent to pick up the request. Once it has, it handles the
chunking logic and attempts to identify various points of detections before returning it to the
server and reporting. The full report is available to the user at
http://127.0.0.1:5566.
Installing
Installing, for the most part, is straight forward. The only issues themselves come from Defender. The first thing is to spin up a Windows VM with all the updates applied. Then, make sure that the engine itself is up to date.

The biggest issue here was the constant spamming of the "please review these malicious files". I didn't put much effort into this, but fro my ChatGPTing, I made notes and attempts at tracking the local copies and disable various toasts:
Supposedly the local path for binaries Dender has flagged:
c:\ProgramData\Microsoft\Windows Defender\LocalCopyAnd the toast notifications:
# Define the registry path
$registryPath = "HKLM:\SOFTWARE\Policies\Microsoft\Windows Defender\UX Configuration"

# Check if the registry key exists; if not, create it
if (-not (Test-Path $registryPath)) {
    New-Item -Path "HKLM:\SOFTWARE\Policies\Microsoft\Windows Defender" -Name "UX Configuration" -Force
}

# Set the Notification_Suppress value to 1
Set-ItemProperty -Path $registryPath -Name "Notification_Suppress" -Value 1 -Type DWord

Write-Host "Windows Defender notifications have been disabled. Restart your computer to apply the changes."
I am unsure if any of these changes made a positive impact, but it did stop spamming? Alternatively, you could enable sample submission and that would remove the prompts, too.
Next, install the following on the machine you wish to upload and view the GUI from:
# Radare2
git clone https://github.com/radareorg/radare2.git
cd radare2
sys/install.sh
python3 -m venv venv
source venv/bin/activate
pip install .
Once installed, we now need to upload the TLSH data into the database. In data/
locate the tlsh.tar.gz file and extract it:
tar -xvf tlsh.tar.gzOnce decompressed, run the upload script:
python3 scripts/upload_tlsh_map.pyWhen ready, fire off the UI/API
python3 api/api.pyBack on the Windows VM, fire off the Citadel.Static.exe and point it to the API.
This will then start the agent and begin polling for tasks.
.\Citadel.Static.exe http://192.168.1.212:5566PE Parsing
PE parsing in Citadel leverages multiple libraries to extract its data. The tools used include:
- LIEF for internal file names and export details.
- PEFILE for optional headers, timestamps, and code-signing information.
- Radare2 for detailed binary analysis, including sections, imports, exports, functions, and strings.
- Detect-It-Easy for identifying compilers, libraries, linkers, packers, and tools.
LIEF
This could likely be removed as it has one objective, identify the internal file name:
import lief

def get_internal_file_name(file: str) -> str:
    """
    get the internal file name of a PE file
    :param file: the path to the file
    :type file: str
    :return: the internal file name
    :rtype: str
    """

    with open(file, "rb") as f:
        file_bytes = f.read()

    l = lief.PE.parse(raw=list(file_bytes))

    if not l:
        return ""

    export = l.get_export()

    if not export:
        return ""

    name = export.name

    if ".dll" in name or ".exe" in name:
        return name
    else:
        return ""
PEFile
PEFile pulls out the Optional Headers, timestamp, and parses (if present) the code-signing information.
def parse_pe(file: str) -> PayloadFile:
    """
    get pe components specific to pefile
    :param file: the input file
    :type file: str
    :return: an updated BinaryFile object
    :rtype: BinaryFile
    """
    with open(file, "rb") as f:
        pe = pefile.PE(data=f.read())

    optional_headers = get_optional_header_fields(pe)

    timestamp = get_time_stamp(pe)

    certificates = get_certificate_info(pe, file)

    return PayloadFile(
        optional_headers=optional_headers,
        timestamp=timestamp,
        certificates=certificates,
    )
Radare2
This pulls out the bulk of the information as it obtains a few additional pieces that other libraries do not:
def parse_sample(self) -> PayloadFile:
    """
    parse the binary file and return the information from r2
    :return: the binary file information as a dataclass
    :rtype: BinaryFile
    """

    bf = PayloadFile(
        file_name=self.file_path,
        architecture=self.arch,
        file_size=os.path.getsize(self.file_path),
        sections=self.get_sections(),
        imports=self.get_imports(),
        exports=self.get_exports(),
        functions=self.get_binary_functions(),
        strings=self.get_strings(),
        entrypoint=self.get_entrypoint(),
    )

    return bf
Detect-It-Easy
Finally, this detects a few specific things:
- Compiler
- Library
- Linker
- Packer
- Sign Tool
- Tool
if type_ == "compiler":
    payload_file.compilers.append(detect_it_easy)
elif type_ == "library":
    payload_file.libraries.append(detect_it_easy)
elif type_ == "linker":
    payload_file.linkers.append(detect_it_easy)
elif type_ == "packer":
    payload_file.packers.append(detect_it_easy)
elif type_ == "sign tool":
    payload_file.sign_tools.append(detect_it_easy)
elif type_ == "tool":
    payload_file.tools.append(detect_it_easy)
else:
    continue
This is an awesome tool to identify what toolset the application was compiled/packed with.
Agent Communication
Citadel has two components:
- A Python Quart API serving a UI and various API Endpoints
- A C# Agent which communicates with the API to retrieve the sample
The C# Agent will reach out every five seconds and ask for a task. The task structure looks like this (with some extra bits we’ll look at later):
class TASK_STATUS(IntEnum):
    PENDING = 1
    IN_PROGRESS = 2
    COMPLETED = 3
    FAILED = 4

    def __str__(self) -> str:
        return self.name.lower()


@dataclass_json
@dataclass
class Task:
    """uuid representing the task"""

    uuid: str = field(default_factory=get_random_uuid)

    """status of the task"""
    task_status: str = field(default=TASK_STATUS.PENDING.name)

    """time the task was sent"""
    time_sent: int = field(default_factory=int)

    """time sent in %Y-%m-%dT%H:%M:%S.%fZ"""
    time_sent_str: str = field(default_factory=str)

    """time updated in %Y-%m-%dT%H:%M:%S.%fZ"""
    time_updated_str: str = field(default_factory=str)

    """time the task was updated"""
    time_updated: int = field(default_factory=int)

    """sha256 hash of the file"""
    file_sha256: str = field(default_factory=str)

    """name of the file"""
    file_name: str = field(default_factory=str)

    """whether to enable static analysis"""
    enable_static_analysis: bool = field(default=True)

    """whether to enable dynamic analysis"""
    enable_dynamic_analysis: bool = field(default=False)

    """whether to double down on scanning"""
    enable_thorough_defender: bool = field(default=False)

    """the amsi result"""
    amsi_result: str = field(default_factory=str)

    """the defender result"""
    defender_result: str = field(default_factory=str)

    """list of threats"""
    threat_names: list = field(default_factory=list)
Once the agent has the task, it will then parse the config and request the files bytes.
Capabilities
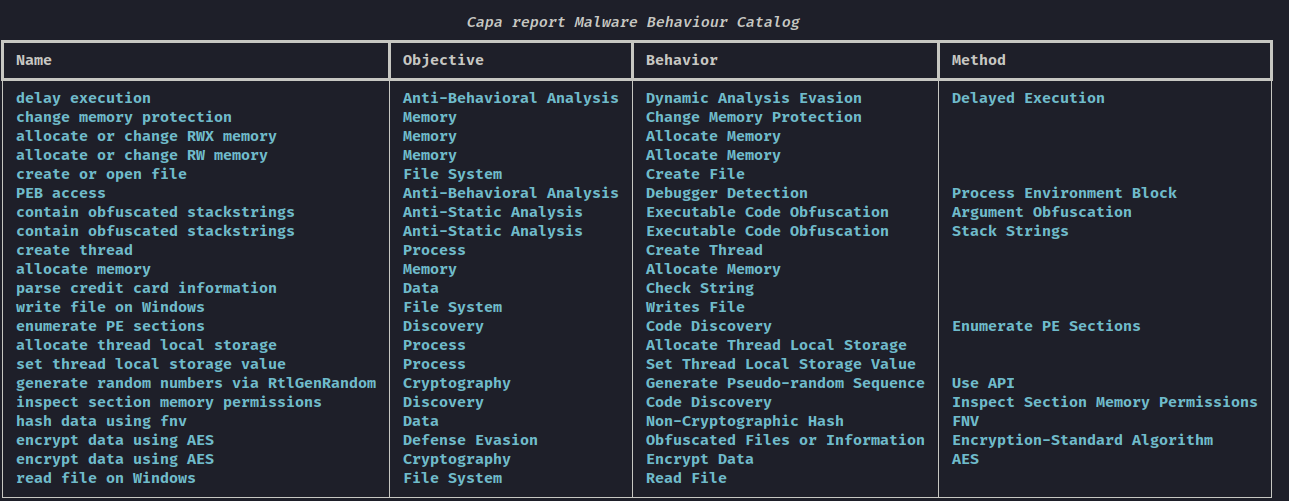
During the preprocess phase, Capa is used to detect capabilities. Due to this, we also hit the Malware Behavior Catalog signatures too. This gives us a nice overview of what the capabilities of this sample are, and how they map to MITRE ATT&CK.

Scanning with Defender
Next, it then uses Defender's MpCmdRun.exe to run a scan. The internal logic from
this was heavily inspired by ThreatCheck/Scanners/DefenderScanner.cs
where it chunks the file and saves it to disk, then scans each chunk and tracks the result.
The logic for using MpCmdRun is quite straight forward. We use several flags for
this, then just wrap it up on the C# Process Creation routine:
public static DefenderScanModel ScanFileWithDefender(string filePath)
{
    ProcessStartInfo processStartInfo = new ProcessStartInfo(@"C:\Program Files\Windows Defender\MpCmdRun.exe")
    {
        Arguments = $"-Scan -ScanType 3 -File \"{filePath}\" -DisableRemediation -trace -Level 0x10",
        CreateNoWindow = true,
        RedirectStandardOutput = true,
        UseShellExecute = false,
        WindowStyle = ProcessWindowStyle.Hidden
    };
    Process process = new Process
    {
        StartInfo = processStartInfo
    };
    process.Start();
    process.WaitForExit(DEFENDER_TIMEOUT);
    if (!process.HasExited)
    {
        Logger.Bad("Windows Defender scan timed out.");
        process.Kill();
    }

    string output = process.StandardOutput.ReadToEnd();

    string threatName = string.Empty;

    foreach (string line in output.Split(new[] { Environment.NewLine }, StringSplitOptions.None))
    {
        if (line.Contains("Threat  "))
        {
            var sig = line.Split(' ');
            if (sig.Length > 19)
            {
                threatName = sig[19];
                break;
            }
        }
    }

    string defenderResult = process.ExitCode switch
    {
        0 => DEFENDER_RESULT_NOT_DETECTED,
        2 => DEFENDER_RESULT_THREAT_DETECTED,
        _ => DEFENDER_RESULT_ERROR
    };

    return new DefenderScanModel
    {
        ResultTitle = defenderResult,
        ThreatNames = new List<string> { threatName }
    };
}
ScanType 3: Custom ScanDisableRemediation: No actions are applied after detectionTraceandLevel 10: Verbose logging on all components
Regarding DisableRemediation, this is from the help menu of MpCmdRun:
[-DisableRemediation]
This option is valid only for custom scan.
When specified:
    - File exclusions are ignored.
    - Archive files are scanned.
    - Actions are not applied after detection.
    - Event log entries are not written after detection.
    - Detections from the custom scan are not displayed in the user interface.
    - The console output will show the list of detections from the custom scan.
The AnalyzeFile()
and HalfSplitter
functions from ThreatCheck are responsible for chunking the file down and then
scanning it. When developing this
approach, I implemented three variations of scanning and there are probably more.
- 0 -> X
- X -> Y
- Chunk Matching (Thorough)
0 -> X
This one is the most obvious method. This reports the byes from the start of the file, up to the last chunk which caused the alert. Essentially, the buffer is slowly incrementing in size.

X -> Y
This method attempts to isolate the specific region by ONLY reporting the chunk that flagged. This has an obvious error of "what if theres more than one trigger".

Thorough
Finally, this goes through the entire file and flips a switch when something has been detected. Once a new chunk is no longer detected, then it flips it back off. This allows us to track down every combination of bad bytes.

Wrapping up scanning
Once all that is done, it packages up the bytes, and some other bits, and sends it back to the API:
OutgoingTaskModel outgoingTask = new OutgoingTaskModel
{
    Uuid = task.Uuid,
    TaskStatus = TaskStatusEnum.Completed.ToString(),
    TimeSent = task.TimeSent,
    TimeUpdated = DateTimeOffset.UtcNow.ToUnixTimeSeconds(),
    FileSha256 = task.FileSha256,
    FileName = task.FileName,
    EnableThoroughDefender = task.EnableThoroughDefender,
    AmsiResult = amsiResult,
    DefenderResult = defenderScan.ResultTitle,
    DefenderThreats = defenderScan.ThreatNames,
    ZeroXBase64MaliciousBytes = zeroXbase64MaliciousBytes,
    XYBase64MaliciousBytes = xyBase64MaliciousBytes,
    ListOfMaliciousBytes = defenderScan.Base64MaliciousRegions
};
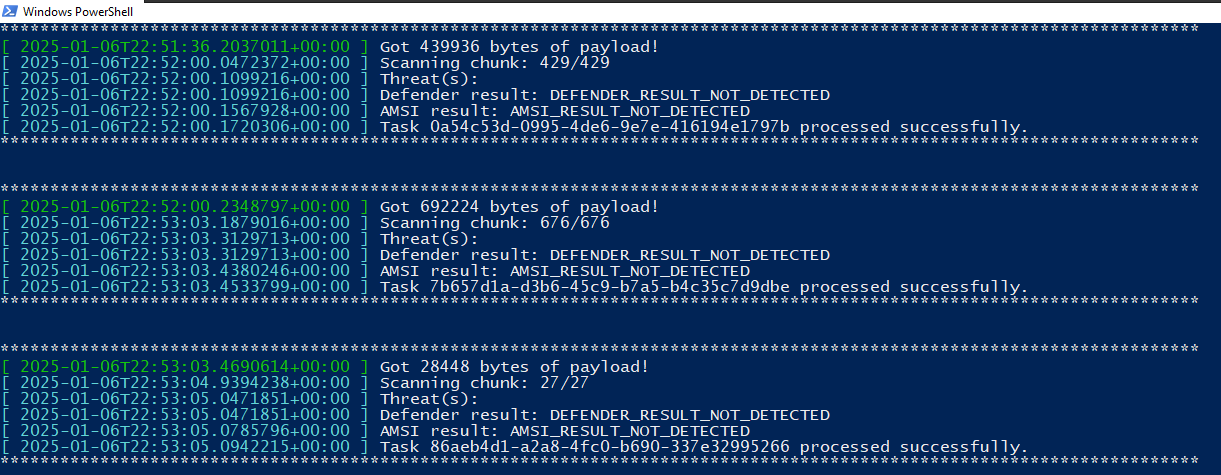
This is the output as its executing:
TLSH
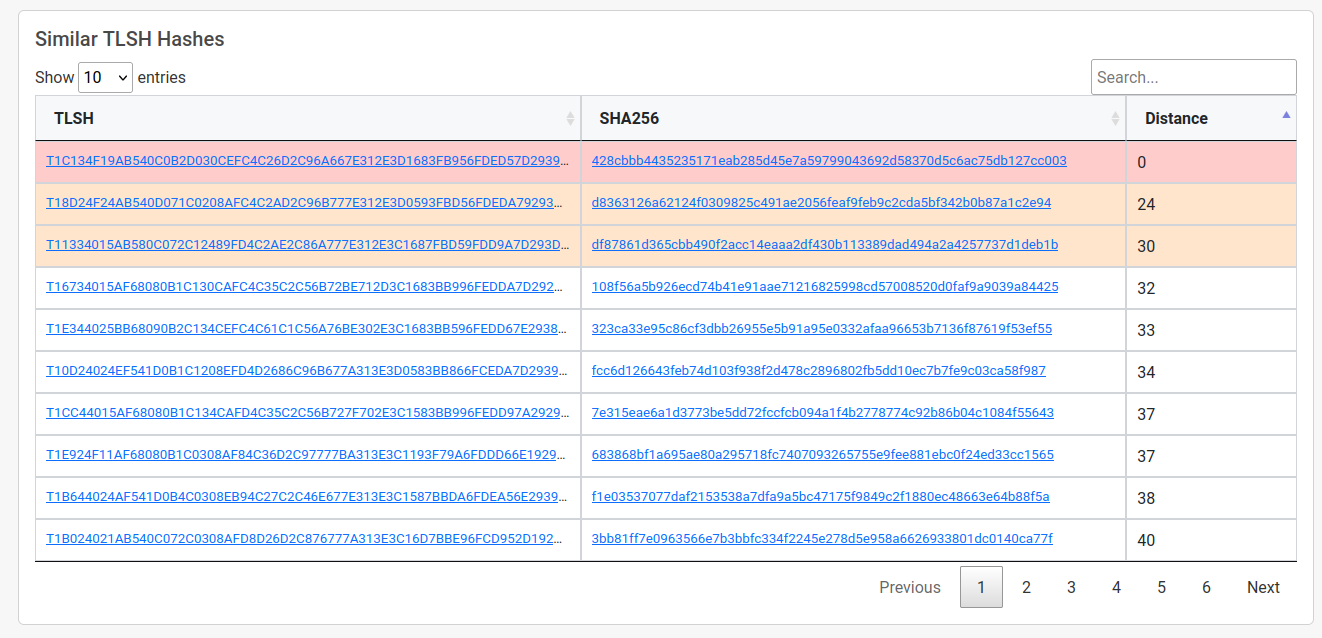
michaeljranaldo and I have been working on some machine learning projects for a while now. And across that time, we have created a pretty hefty dataset for malware (and goodware).
For each sample we parsed, we also calculated the TLSH. Using that dataset, I created a mapping of only the TLSH properties and exported it to JSON to use within this project.
For the unaware, TLSH is a fuzzy hash that excels in accuracy, robustness, speed, and scalability. Unlike other fuzzy hashes, TLSH uses a distance score, enabling fast nearest neighbor search and large-scale clustering. Its fixed-length digest and use of k-skip ngrams enhance its security and efficiency (TrendMicro, 2021).
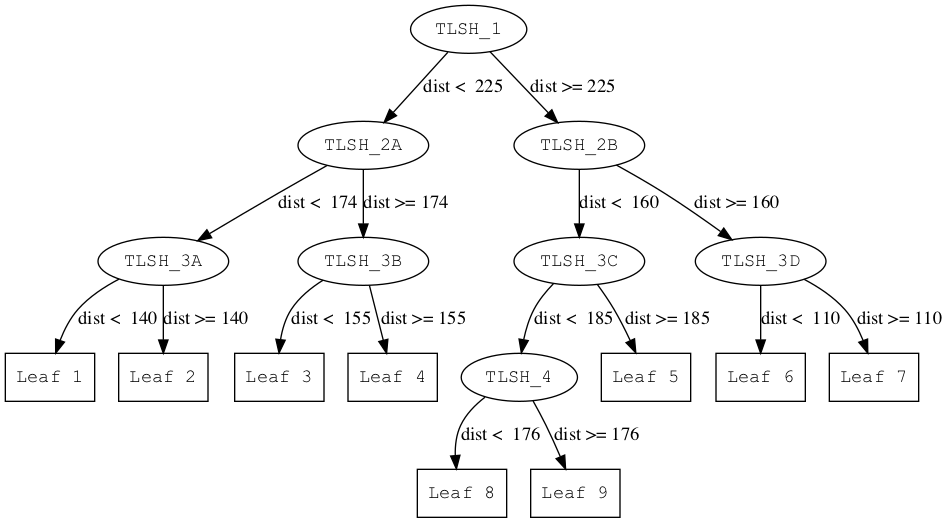
With this data, Citadel ingests it into the database and then the preprocessing routine will
perform a lookup. As of now (and as default), its minimum distance is 50. However, this can be
changed with the --tlsh-distance flag.
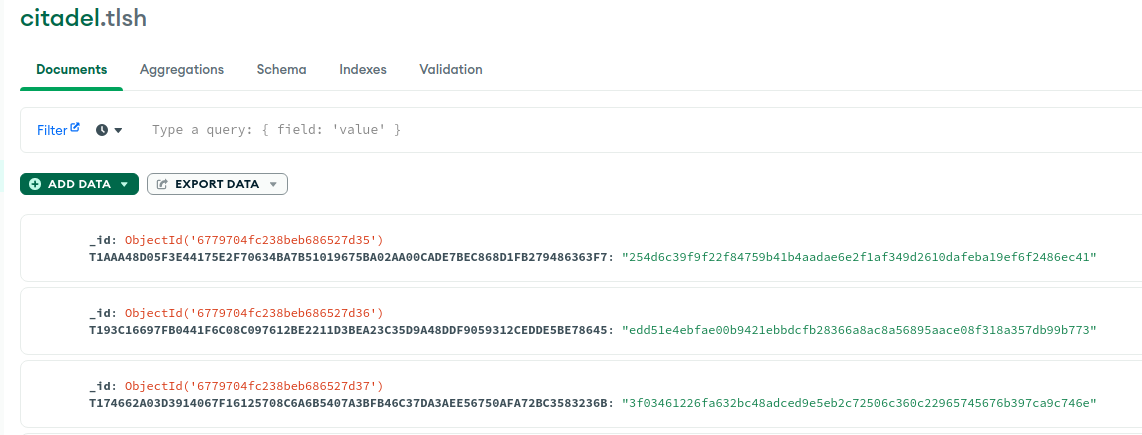
The logic to do this is quite simple:
async def find_similar_hashes(input_tlsh: str, max_distance: int = 50) -> list:
"""
find_similar_hashes searches the MongoDB database for similar TLSH hashes

:param input_tlsh: the TLSH hash to search for
:type input_tlsh: str
:param max_distance: distance between hashes, defaults to 50
:type max_distance: int, optional
:return: list of similar hashes
:rtype: list
"""

client = AsyncIOMotorClient("mongodb://localhost:27017")

db = client.citadel

tlsh_collection = db.tlsh

cursor = tlsh_collection.find()
similar_hashes = []

async for record in cursor:
    for db_tlsh, db_sha256 in record.items():
        if db_tlsh == "_id":
            continue

        try:
            distance = tlsh.diff(input_tlsh, db_tlsh)
            if distance <= max_distance:
                similar_hashes.append(
                    {"tlsh": db_tlsh, "sha256": db_sha256, "distance": distance}
                )
        except ValueError:
            logger.warning(f"Skipping invalid TLSH: {db_tlsh}")

if similar_hashes:
    similar_hashes.sort(key=lambda x: x["distance"])

return similar_hashes
Function Grouping
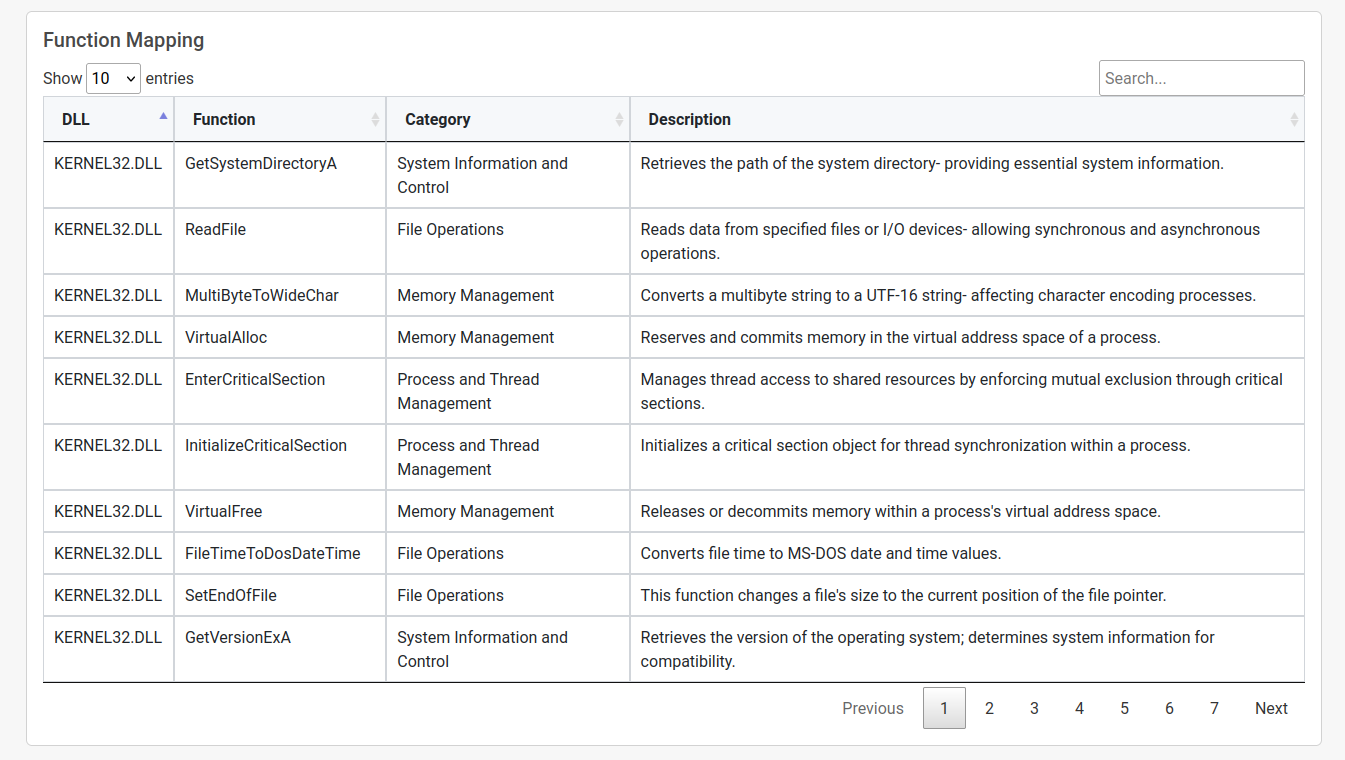
In Categorising DLL Exports with an LLM I discussed the process of categorising Windows functionality via an LLM. The gist I provided from that is downloaded and parsed onto the API server. Each function imported by the PE is that ran through this logic and reported in the UI (which we will cover in the next section). The goal here is to get a topdown view of what functionality the file may be attempting.
UI
At the beginning of the post, I showed the dashboard - lets take a look at the summary pages by clicking on a known-bad sample. At the top of the page, we have some metadata about the scan type, detection status, and some "at a glance" charts.
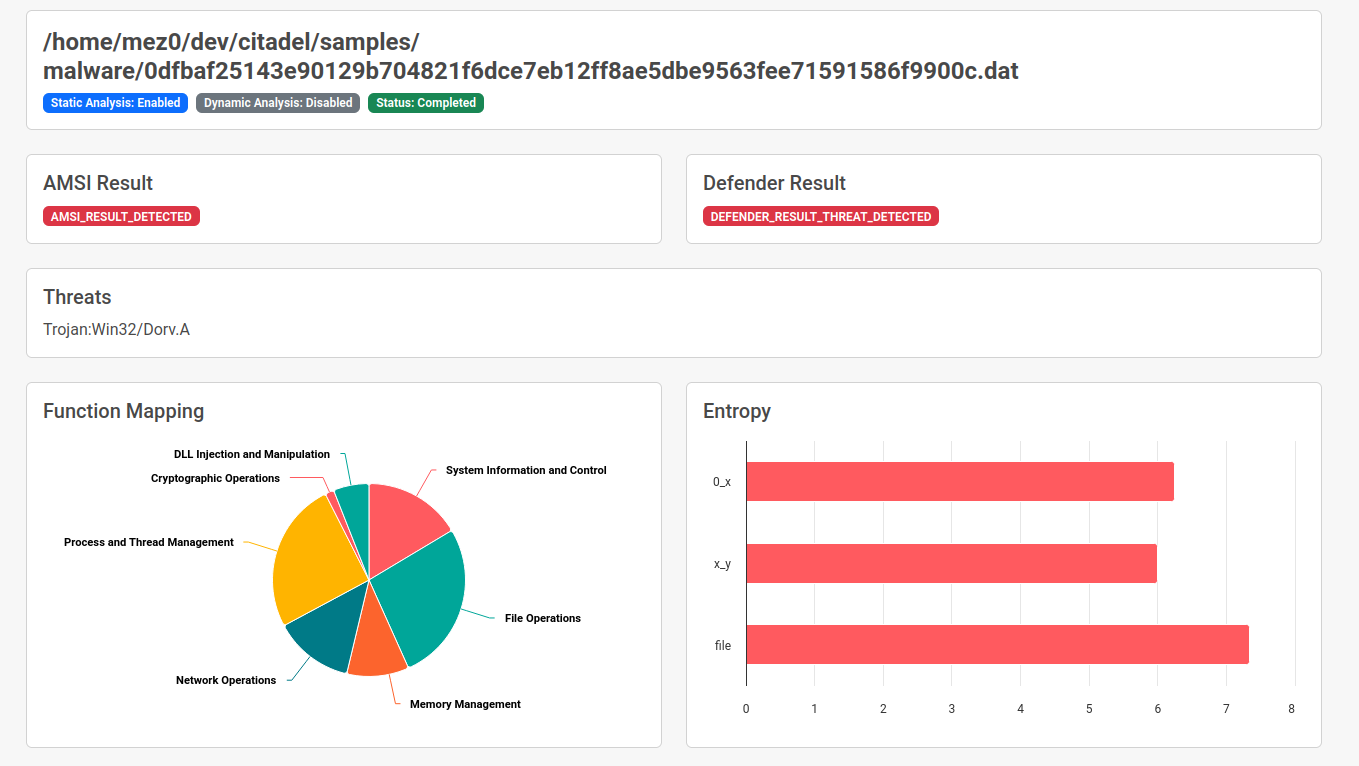
This particular sample had a lot of hits with the function mapping, and some pretty high entropy across the board.
Scrolling down we see another handy chart which just gives us a quick overview of where our imports come from, followed by a few panes detailing the PE internals.
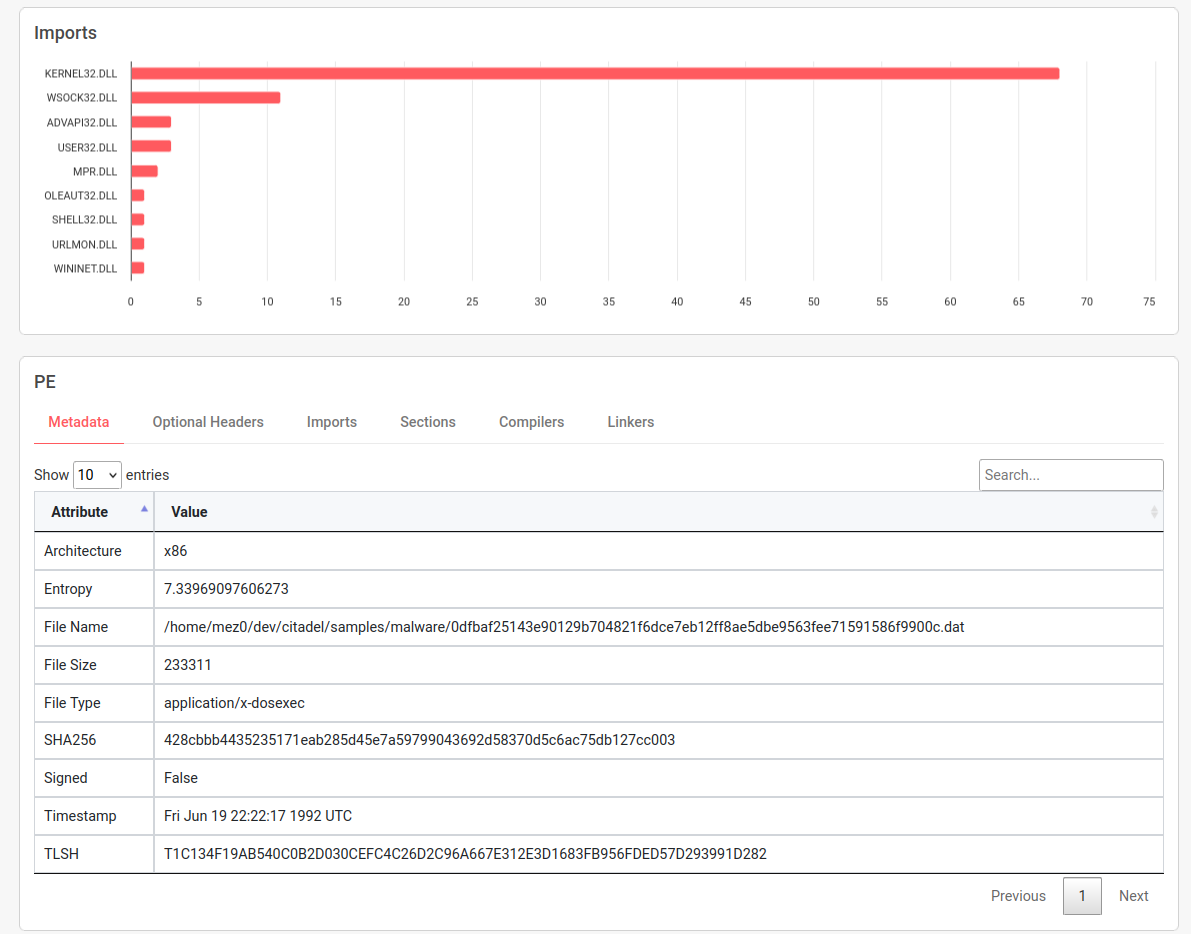
There is a lot of data on the PE which isn't inherently useful at this point, but I want to draw your attention to Compilers and Linkers


These are the tools that were used to compile the binary. This is useful for tracking down the source of the binary, and even more useful in later projects.
Next, we move onto the function mapping table which we previously discussed.
Also, TLSH which has had a small colour mapping applied. Remember, 0 is a direct match.
This brings us to the final component, the byte matches. At this point, we show both the 0 -> X
and X -> Y. I found in my testing that some binaries are way more obvious that others for which
the malicious bytes are - I also found its much more noticable in .NET binaries as the detected
bytes was typically some sort of string like dinvoke something or other.
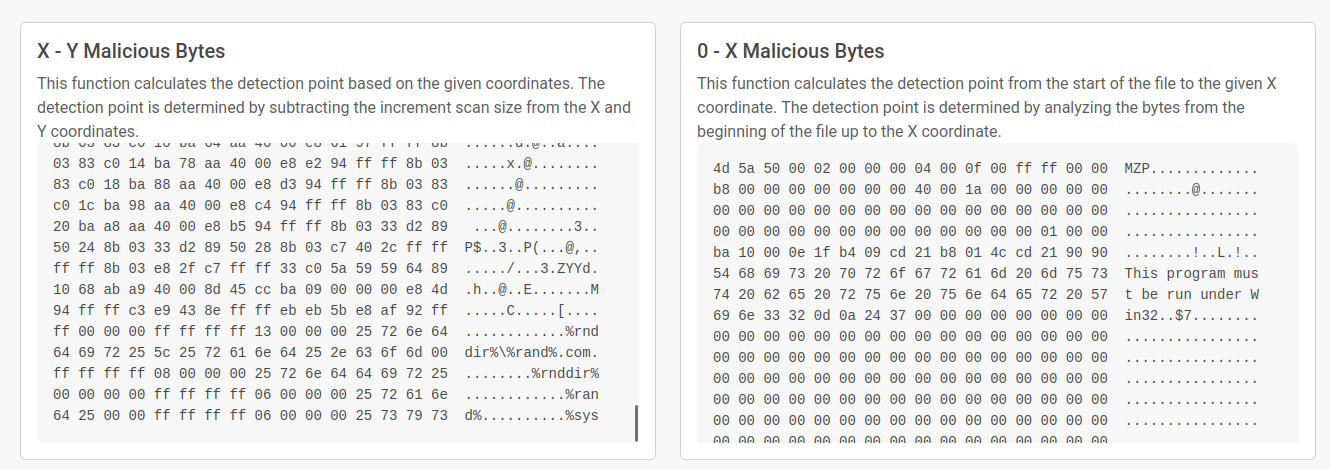
In this particular sample, it seems the detection was found here:
50 24 8b 03 33 d2 89 50 28 8b 03 c7 40 2c ff ff  P$..3..P(...@,..
ff ff 8b 03 e8 2f c7 ff ff 33 c0 5a 59 59 64 89  ...../...3.ZYYd.
10 68 ab a9 40 00 8d 45 cc ba 09 00 00 00 e8 4d  .h..@..E.......M
94 ff ff c3 e9 43 8e ff ff eb eb 5b e8 af 92 ff  .....C.....[....
ff 00 00 00 ff ff ff ff 13 00 00 00 25 72 6e 64  ............%rnd
64 69 72 25 5c 25 72 61 6e 64 25 2e 63 6f 6d 00  dir%\%rand%.com.
ff ff ff ff 08 00 00 00 25 72 6e 64 64 69 72 25  ........%rnddir%
00 00 00 00 ff ff ff ff 06 00 00 00 25 72 61 6e  ............%ran
64 25 00 00 ff ff ff ff 06 00 00 00 25 73 79 73  d%..........%sys
Conclusion
Overall, this was a fun project to build out and it serves two main solutions for me:
- Something to sanity check a payload prior to dropping it on a client
- A redesign, with more capabilities, to enable some future ML projects
That said, it still has its issues. Its not very memory efficient and can take some time to run for both the agent and the parser. Also, it would be cool if this worked on other payload types such as script-based implants and so on.
For future work, this could utilise Byte Histograms to create byte representations of the files themselves (Beckman & Haile, 2020), ultimately prepping for some ML work and generally visualising the layout of a file. Another cool feature I planned for was the implementation of dynamic analysis. Not to recreate sandboxing, but it would be interesting to see an agent which wrapped tools like pe-sieve and memory scanners before reporting back.
Maybe one day!
References
- TrendMicro. (2021). TLSH: A robust and scalable fuzzy hash. Retrieved from https://tlsh.org/
- Beckman, B. R., & Haile, J. (2020). Binary analysis with architecture and code section detection using supervised machine learning. Retrieved from hhttps://inldigitallibrary.inl.gov/sites/sti/sti/Sort_64585.pdf